
 Pin it
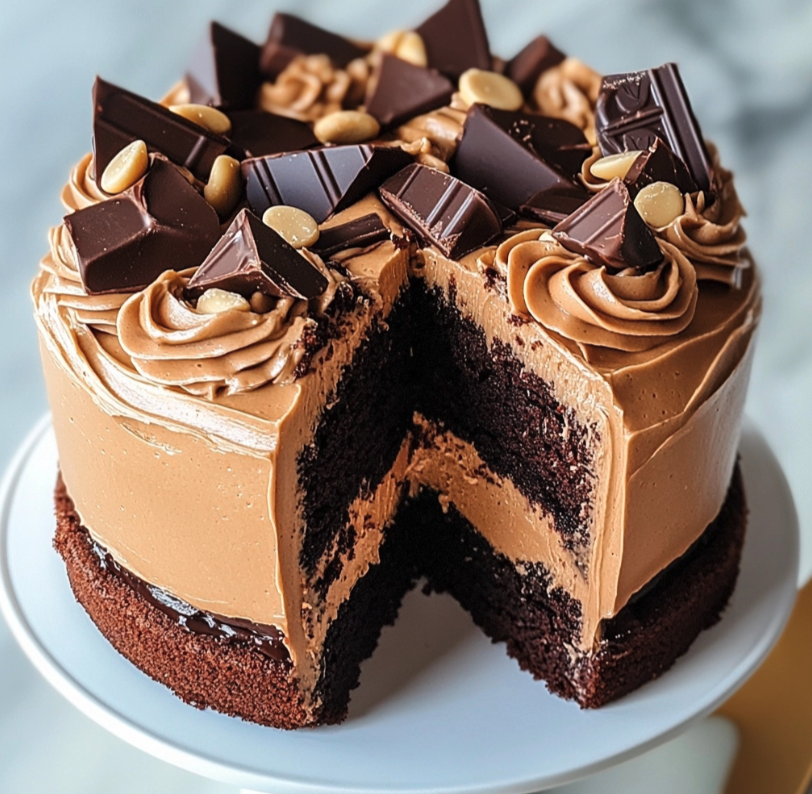
This decadent Reese's Chocolate Peanut Butter Cup Cake transforms the beloved candy into a showstopping dessert that never fails to impress at family gatherings and celebrations. The combination of rich chocolate cake with creamy peanut butter frosting creates an irresistible flavor marriage that chocolate and peanut butter lovers will go crazy for.
I first made this cake for my son's birthday party after he requested "something with Reese's" and it was such a hit that it's now requested at nearly every family gathering. The way the peanut butter layer creates almost a cheesecake texture is absolutely magical.
Ingredients
- 1 box dark chocolate fudge cake mix: provides the perfect rich chocolate base without complicated measuring
- 8 oz cream cheese softened: creates that incredible creamy texture in the frosting
- ½ cup unsalted butter softened: adds richness to the peanut butter layer
- ½ cup creamy peanut butter: use a commercial brand like Jif or Skippy for best results
- 1 teaspoon vanilla extract: enhances the overall flavor profile
- 4 cups powdered sugar: creates the perfect sweetness and stability in the frosting
- ½ cup chocolate chips: semi sweet works best for balancing sweetness
- 1 cup miniature Reese's peanut butter cups halved: these are the star of the show
- Vanilla ice cream for serving: adds a wonderful temperature contrast
Step-by-Step Instructions
- Prepare the oven:
- Set your oven to preheat at 350°F. This temperature ensures the cake bakes evenly while allowing the peanut butter layer to set properly without burning. Take this time to gather all your ingredients so everything is ready to go.
- Prepare the baking dish:
- Thoroughly coat a 9×13 inch baking dish with cooking spray, making sure to get the corners and sides well. This prevents any sticking and makes serving much easier later.
- Mix the cake batter:
- Follow the package instructions for your chocolate cake mix, typically adding eggs, oil, and water. Whisk thoroughly for about 2 minutes until no lumps remain. The batter should be smooth and pourable but not too thin.
- Create the base layer:
- Pour the chocolate cake batter into your prepared baking dish, using a spatula to spread it evenly to all corners. Make sure the surface is level for even baking.
- Prepare the peanut butter layer:
- In a separate bowl, combine the softened cream cheese, butter, peanut butter, and vanilla. Make sure these ingredients are truly room temperature for the smoothest results. Beat with an electric mixer for 2 to 3 minutes until completely smooth and fluffy.
- Add sweetness:
- Gradually incorporate the powdered sugar one cup at a time, mixing well between additions. This prevents clumps and ensures a silky smooth frosting. Continue mixing until the frosting is light and creamy, about 2 minutes more.
- Layer the frosting:
- Carefully spread the peanut butter cream cheese mixture over the cake batter. Use a light touch to avoid mixing the layers, working from the center outward with an offset spatula for best results.
- Add chocolate chips:
- Evenly sprinkle the chocolate chips over the entire peanut butter layer. They will partially sink into the frosting but remain visible on top.
- Add Reese's cups:
- Distribute the halved peanut butter cups across the surface, gently pressing them slightly into the frosting. Space them evenly so each slice will get several pieces.
- Bake to perfection:
- Place the cake in your preheated oven and bake for 45 to 50 minutes. The cake is done when a toothpick inserted in the center comes out with just a few moist crumbs but no wet batter.
- Cool completely:
- Allow the cake to cool on a wire rack for at least 1 hour before serving. This cooling time helps the layers set properly and develops the flavors.
- Slice and serve:
- Cut into squares using a sharp knife, cleaning the blade between cuts for neat slices. Serve each portion with a scoop of vanilla ice cream for the ultimate indulgence.
 Pin it
My absolute favorite part about this cake is how the peanut butter layer gets this slightly crisp top during baking while staying creamy underneath. It reminds me of when I was a kid and my grandmother would make her special peanut butter fudge that had that same magical texture contrast.
Storage Tips
This cake actually tastes even better the day after baking as the flavors have time to meld. Store covered in the refrigerator for up to 5 days. I recommend removing slices about 20 minutes before serving to take the chill off for the best flavor and texture. If you want to freeze portions, wrap individual slices tightly in plastic wrap and then foil. When ready to enjoy, thaw overnight in the refrigerator for best results.
 Pin it
Easy Variations
This versatile recipe welcomes creative adaptations. Try using chunky peanut butter instead of creamy for added texture. White chocolate chips make a beautiful contrast against the dark cake. You can also substitute other candy pieces like Butterfingers, Snickers, or M&Ms for the Reese's cups. For a more sophisticated version, add a tablespoon of espresso powder to the cake mix to enhance the chocolate flavor.
Serving Suggestions
While vanilla ice cream is the classic pairing, this cake also shines alongside other accompaniments. Try serving with a drizzle of warm chocolate sauce, a dollop of freshly whipped cream, or even a scoop of coffee ice cream for an interesting flavor contrast. For special occasions, dust the top with a light sprinkle of cocoa powder or powdered sugar just before serving for an elegant presentation.
Frequently Asked Questions
- → Can I use a different type of chocolate cake mix?
Yes! While dark chocolate fudge cake mix adds a rich depth of flavor, you can substitute it with any chocolate cake mix you prefer.
- → Can I make this cake gluten-free?
Absolutely. Use a gluten-free chocolate cake mix and ensure all other ingredients are gluten-free as well.
- → How can I customize this cake further?
Feel free to add chopped nuts, use white chocolate chips, or drizzle caramel sauce on top for extra flavor.
- → Should this cake be served warm or cold?
You can serve the cake warm for a gooey texture or cold for a firmer slice. Pairing it with vanilla ice cream is recommended!
- → How should I store leftovers?
Store leftovers in an airtight container in the refrigerator for up to 5 days. Reheat individual slices in the microwave for 10-15 seconds if desired.