
 Pin it
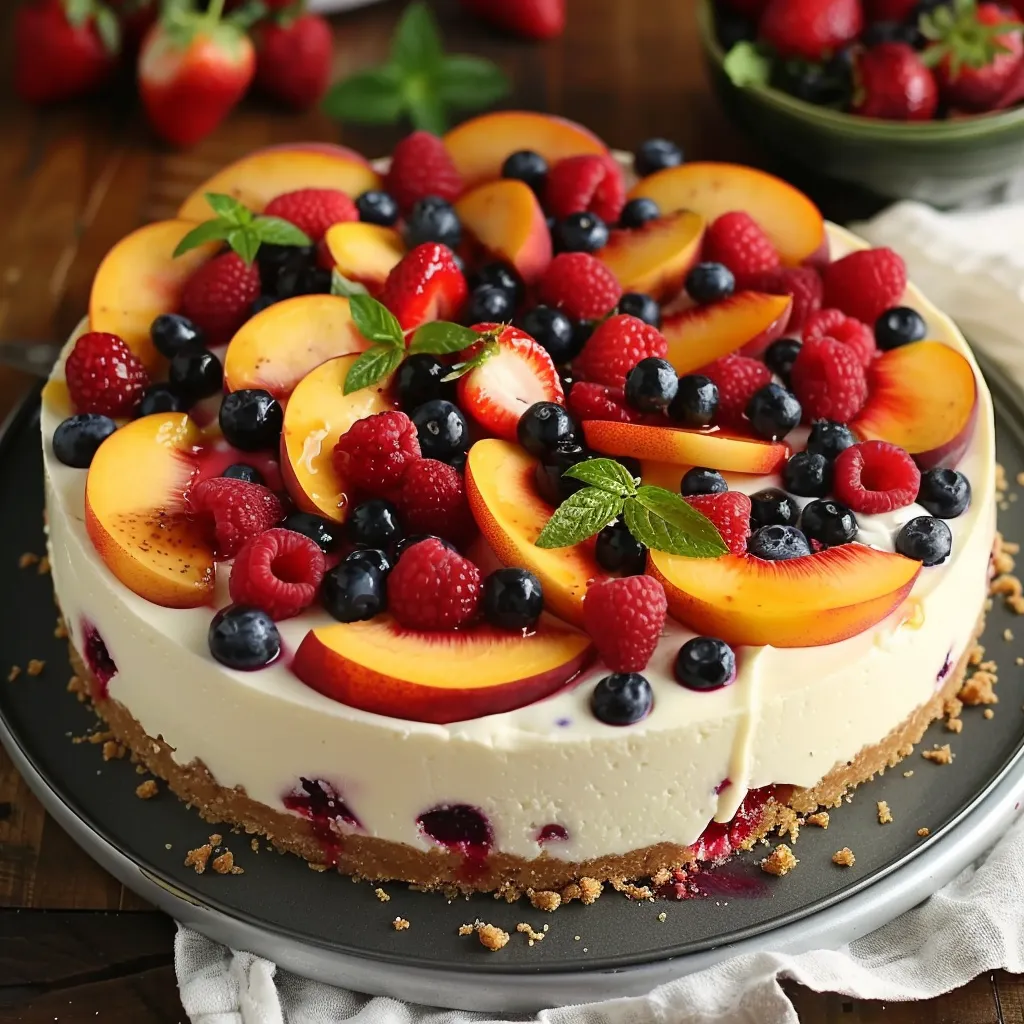
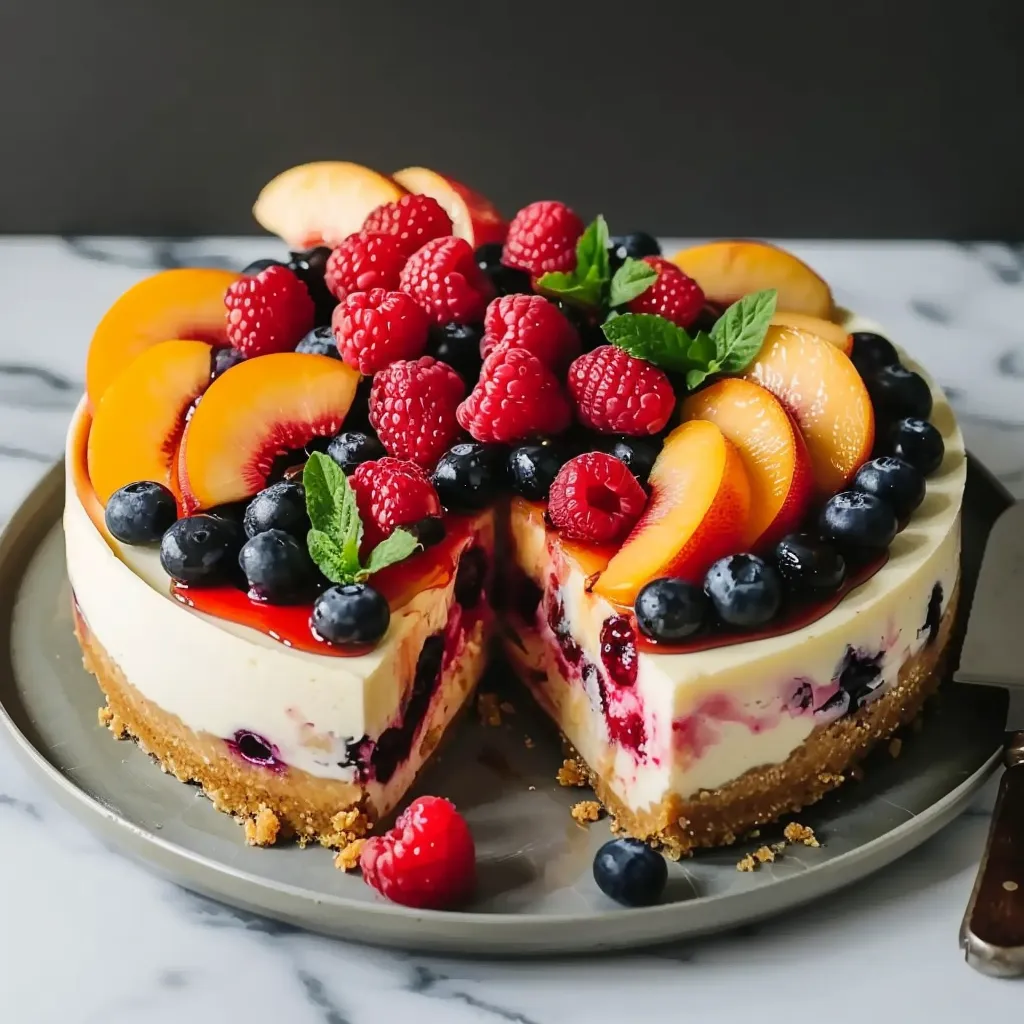
This decadent no-bake summer berry and peach cheesecake celebrates the season's most vibrant fruits atop a silky smooth canvas. The combination of juicy peaches with a medley of berries creates a dessert that's as beautiful to look at as it is delicious to eat.
I created this recipe for my daughter's graduation party last summer, and it was the first dessert to disappear completely. Now our family gatherings aren't complete without this cheesecake making an appearance.
Ingredients
For the Crust
- Graham cracker crumbs: Provide that classic cheesecake foundation with a hint of honey sweetness
- Granulated sugar: Balances the slight saltiness of the crackers
- Unsalted butter: Acts as the binding agent look for European style for extra richness
For the Cheesecake Filling
- Cream cheese: Forms the backbone of any great cheesecake always use full fat for proper texture
- Granulated sugar: Sweetens without adding moisture that could make the filling runny
- Large eggs: Provide structure and richness bring to room temperature for better incorporation
- Vanilla extract: Adds that warm familiar flavor use pure not imitation
- Almond extract: Amplifies the fruit flavors without overwhelming them
- Sour cream: Contributes tanginess and creaminess opt for full fat
- Heavy cream: Creates that luxurious mouthfeel look for cream with at least 36% fat
For the Topping
- Fresh peaches: Bring summery sweetness choose ones that yield slightly to pressure
- Fresh berries: Add vibrant color and flavor variety select plump berries without blemishes
- Apricot preserves: Create that professional bakery shine and seal in freshness
- Lemon juice: Brightens all the flavors and prevents fruit discoloration
Step-by-Step Instructions
Prepare the Crust
- Step 1:
- Combine the dry ingredients with melted butter until the mixture resembles wet sand with enough moisture to hold together when pressed between your fingers. The texture should be like damp beach sand not soggy or too dry. Press firmly into the springform pan using the bottom of a measuring cup to create an even compact layer that will hold together when sliced.
Make the Cheesecake Filling
- Step 2:
- Beat cream cheese and sugar until the mixture becomes light and fluffy with no lumps whatsoever. This crucial step creates the foundation for a smooth cheesecake. Add eggs individually at low speed just until the yellow disappears to avoid incorporating excess air which can cause cracks. Fold in the remaining ingredients with gentle strokes until the batter has a silky consistency and runs off the spatula in thick ribbons.
Bake the Cheesecake
- Step 3:
- Create a protective water bath by wrapping the springform pan in heavy duty foil ensuring no seams or gaps exist where water might seep in. The bath maintains even gentle heat throughout baking preventing the harsh temperature changes that lead to cracks. Watch for the perfect jiggle in the center similar to how set Jello moves when the pan is gently shaken.
Prepare the Fruit Topping
- Step 4:
- Heat the preserves until they become loose and glossy stirring occasionally to prevent scorching. Allow to cool slightly until the consistency thickens but remains brushable. Arrange fruit in concentric circles or a creative pattern starting from the outside edge working inward. Apply the glaze with a pastry brush using gentle dabbing motions to avoid disturbing your beautiful arrangement.
This cheesecake reminds me of summer evenings on my grandmother's porch in Georgia where we would pick fresh peaches in the afternoon and transform them into something magical by evening. The combination of peaches and berries became my signature dessert after years of experimenting with different fruit combinations.
Storage Instructions
This cheesecake keeps beautifully refrigerated for up to 5 days when stored properly. Cover loosely with plastic wrap or place in a cake container after the first cutting to prevent the exposed edges from drying out. The fruit topping will remain fresh looking for about 2 days before it begins to release moisture so consider adding it closer to serving time if preparing far in advance.
Making Without Water Bath
If you prefer to skip the water bath method you can still achieve excellent results with a few adjustments. Reduce your oven temperature to 300°F and extend baking time by approximately 15 minutes. Place a shallow pan of water on the rack below your cheesecake to add humidity to the oven environment. After baking run a thin knife around the edge immediately to prevent cracking as it cools and contracts.
Seasonal Variations
This versatile cheesecake shines with whatever fruits are at their peak. In fall substitute thinly sliced apples tossed with cinnamon and a touch of lemon. Winter versions work beautifully with citrus segments and pomegranate arils for a festive holiday appearance. Spring calls for strawberries and rhubarb while early summer brings cherries into the spotlight. The basic cheesecake base remains your constant canvas for seasonal creativity.
 Pin it
Frequently Asked Questions
- → How can I prevent cracks in the cheesecake?
Use a water bath during baking and avoid overmixing the batter to ensure a smooth, crack-free texture.
- → Can I use frozen berries instead of fresh?
Fresh berries are ideal for the best texture and flavor, but you can use thawed frozen berries if fresh ones are unavailable.
- → How long does the cheesecake need to chill?
Refrigerate the cheesecake for at least 4-6 hours or preferably overnight for the best results.
- → What other fruits can I use as a topping?
You can use mangoes, kiwis, or blackberries as alternatives or in addition to the listed berries and peaches.
- → Can I make the crust gluten-free?
Yes, use gluten-free graham cracker crumbs to make the crust suitable for a gluten-free diet.